So, today’s topic is going to be setting up your development
environment. We will go through where to download the AutoCAD ObjectARX SDK,
finding a good location for our DLLs, setting up our first AutoCAD development
project and building our first AutoCAD .Net plug-in… Yay.. on a side note. I’m incredibly sick. Right at this very instant, my amazing wife is rubbing my chest,
upper lip, and feet with “Thieves oil”. It’s made out of real thieves, that way
you know it’s legit.
Ok, so where exactly do we download this from? Good
question? Answer. <- That is the answer…
Now on this page Autodesk is going to ask you for a lot of
information, muscle through it. Give them what they ask for. Right below the
text box where they’re requesting your bank account information, there is going
to be a few radio buttons where you can select what year version of the
ObjectARX SDK you would like to download. Don’t be stupid and not download the
correct one. Read the text. I am working in AutoCAD 2012, so obviously I will
be downloading the 2012 version. Congratulations!!! You have located the
ObjectARX SDK, downloaded it, and are about to install it. Yay!!
Now navigate to where ever your browser of choice stores the
files you download “on the line” and double click shit. After clicking “Run”
you will get this screen

Finding a good location for your files to live. If you notice the text box above the progress bar, the text
reads "C:\ObjectARX 2012". Just put a backslash in place of the space. this is where i like mine to live. "C:\ObjectARX\2012". Please put them where you are not
going to forget where they’re at.
After clicking install and the files are done being unpacked to your directory of choice, they should look like the directory structure below.
What is important to us today is the “..\inc” directory. Our two main development DLLs are called “AcDbMgd.dll” and “AcMgd.dll”. They are located in the "C:\ObjectARX\2012\inc"directory.
What is important to us today is the “..\inc” directory. Our two main development DLLs are called “AcDbMgd.dll” and “AcMgd.dll”. They are located in the "C:\ObjectARX\2012\inc"directory.

Moving on, Let's open an instance of Visual Studio and create a project. I am going to name my project “ExploitingAutoCAD”.


Next we are going to add the references to our project. We right click on the references tree view item and
click "Add Reference...".
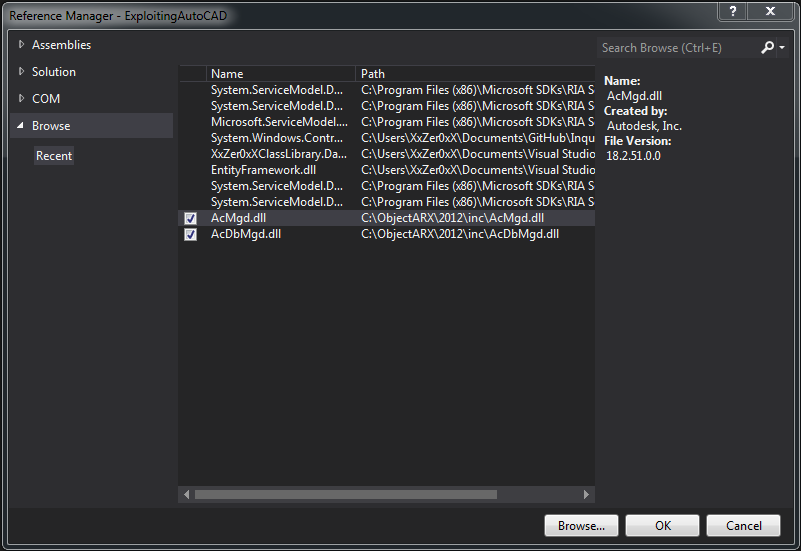
Which will then give us the Reference Manager. We will click on "Browse" and then navigate to "c:\ObjectARX\2012\inc" where "AcMgd.dll" and "AcDbMgd.dll" live. After selecting them and clicking Ok, your reference manager should look like the one below. We click "OK" and we are off.
 This next part is very important, so please pay very close attention. We MUST select our references and and view the properties of our reference. You will see in the data grid the property of "Copy Local" or if you are using SharpDevelop "Local Copy", you must set this to false. If we do not, when we compile our project it will copy these .DLLs to the "..\bin\debug" if you are debugging or "..\bin\release" if you are debugging the release version of your project. AutoCAD will load these and not the .DLLs that are located in the install folder of AutoCAD. Which in turn will generate an error. This would not be a good thing.
 One last thing, There is an issue that happens sometimes when developing an AutoCAD plugin while debugging, Some times the text objects will not show up in your drawing. If you run into this error its probably because as setting in the options is not set correctly. on the MenuBar of Visual Studio, go to: Tools > Options > select the "Debugging" ListViewItem on the left and scroll all the way down. You will see at the very bottom an option that says "Use Managed Compatibility Mode", make sure that it is checked. See the image below.

No comments:
Post a Comment